The advanced appointment window is awesome (if we may say so ourselves) and is a great option if you need to include and access more in-depth details regarding your client/ appointment. In a nutshell, the advance appointment window allows you to create efficiencies in your day-to-day activities by giving you a full glance of your customer’s data in one spot! Awesomeness.
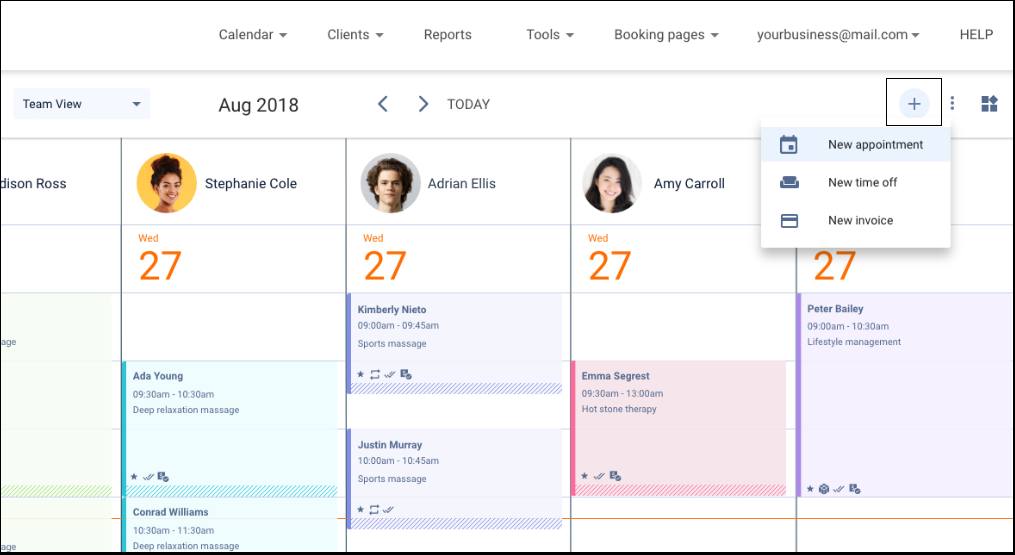
To land here, start on the Calendar page and click on the “+” icon on the top right side of your calendar to choose “New Appointment”:
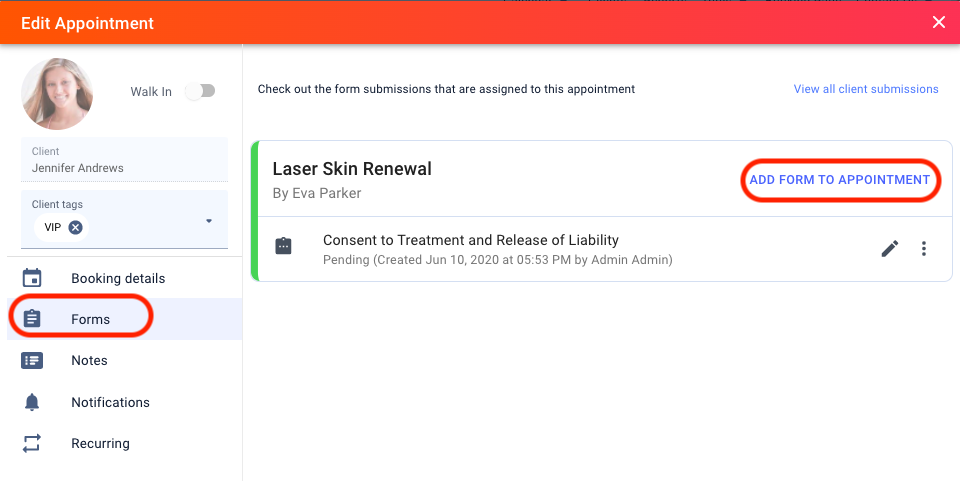
Once within the Advanced Appointment window, you can see a list of parameters including Booking Details, Forms, Notes, Notifications, and Recurring option:

Let’s examine these fields in more detail:
Booking Details: Self-explanatory. Fulfill this section with exclusive booking details including your Client’s Name, Service(s), Time, Date, and more.
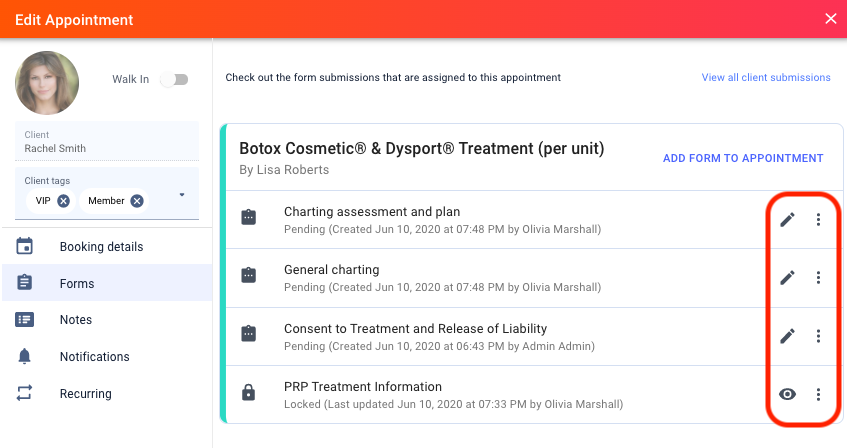
Forms: Assign a form to service and require the client to fulfill the information before their appointment.
Directly from the advance appointment window, you have access to information-packed forms that were previously filled out by your client. You can inter alia add form(s) to an existing appointment, directly from your calendar.
Follow the journey:
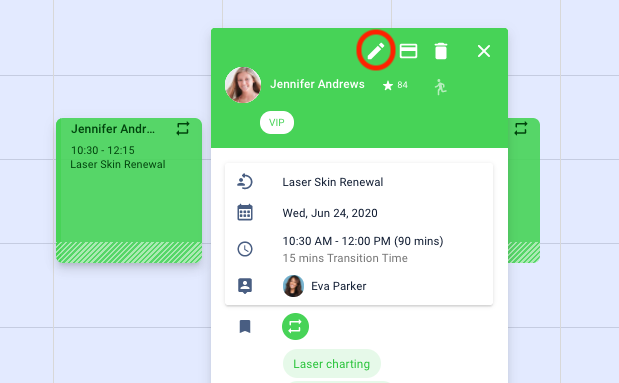
- Select the appointment preview for the appointment you want to add a form to > Select the Edit appointment button
- Select the Forms tab on the left-hand side > Select Add forms to the appointment
- You’ll be taken to an Add New Form area > Search for the form name in the search area > Select the form by ticking the box next to the form > Select the Add Forms button at the bottom to add:
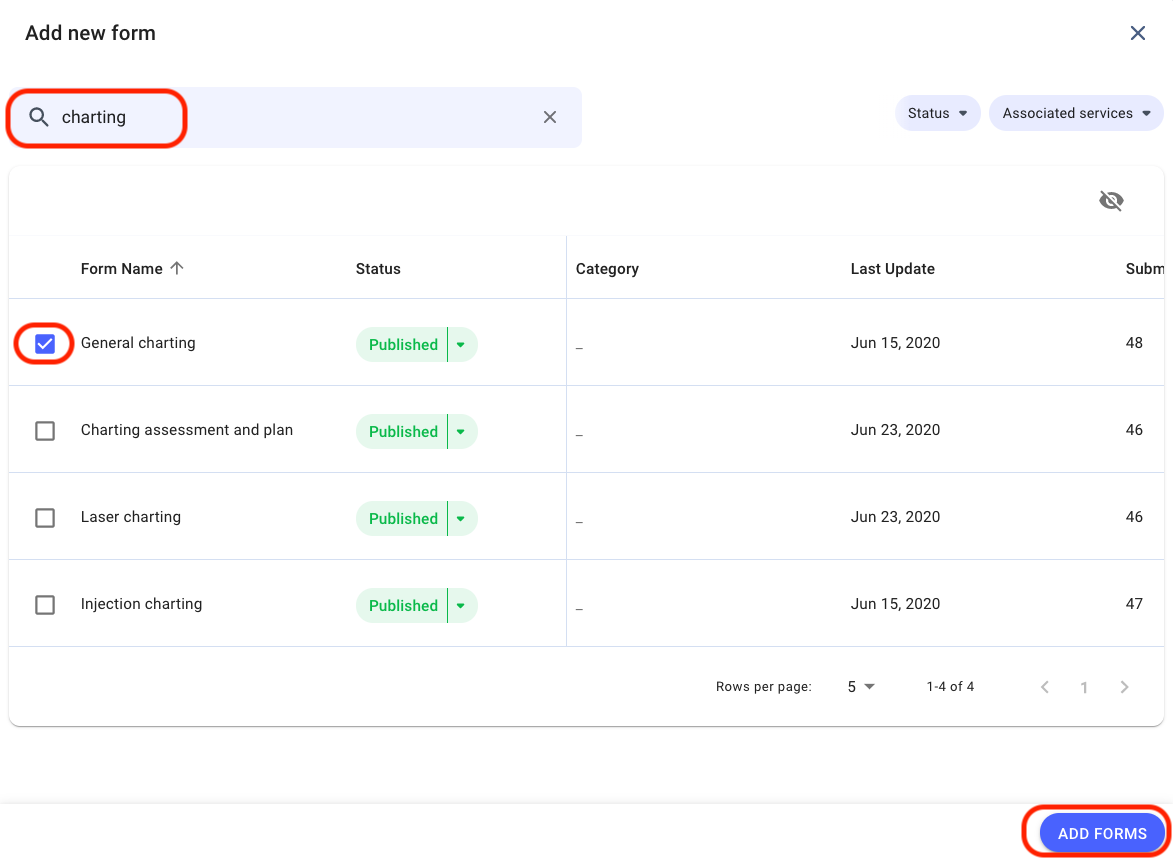
- The form will now be added to this appointment

Voila! The form is now ready for the client to fulfill.
Notes: Utilize the note section however you see fit. Specify sensitive client information, including details about an outstanding balance, late shows, or more importantly, an allergy to a certain product, and get notified! See more in “Setting Up Profile Alerts”
- Add client notes by clicking on the appointment from your calendar
- Once within the appointment window, click the “EDIT” Icon outlined in orange:
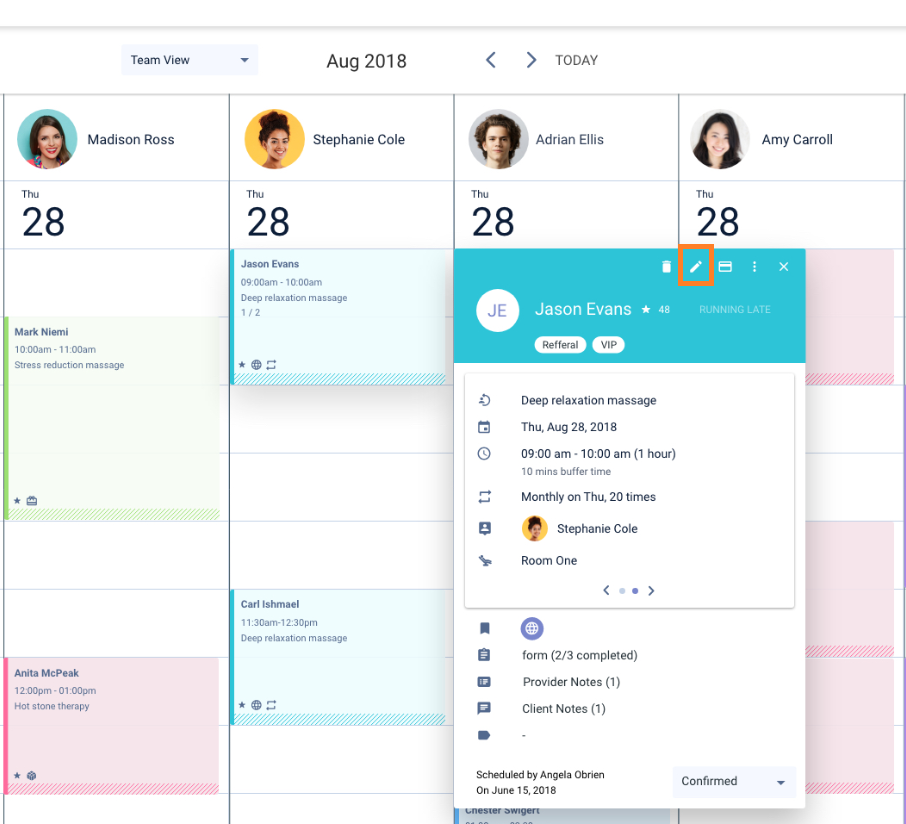
3. You will then be prompted to the following page. Click on “Notes” and enter all the details necessary. Don’t forget to Save! Of course, there is another way to add or edit notes which is through the clients’ profile. We will discuss this in more depth within the chapter dedicated to Client Management.
Notifications: Send out notifications, reminders, and confirmations to your clients before and after appointments. The Notification tab within the advance window allows you to turn notifications “On” or “Off” for an appointment you created. * Please note: you must enter an email or phone number in your clients’ profile for the notifications to be received.

Recurring: Recurring appointments turn customers into regular clients. Yocale makes it easy to create recurring appointments. Refer to our 🎥 Video Guide for a step by step tutorial as we walk you through setting up recurring appointments.
Create Multi-Service Appointments
You can now add multiple services to any appointment with these easy steps directly from your advanced appointment window.

Once you created the first service, click “Add Service” to create the second service. The same process applies for the third or more services.

Once you are done creating the multi service appointments, click on “BOOK” at the bottom of the appointment window.

Voila! You have now created an Appointment with Multi Services.
Smart Availability Finder
With artificial intelligence like the “Availability Finder”, you can pretend you have your assistant. This smart availability finder leads to efficiencies in your day-to-day activities.
From your calendar, click on the 4 dot-like icons outlined below in black.
- A new window will slide open on the right side of your Calendar.
- Click on “Widgets”:

4. Search for the service your client wants and click on “Find Availability”.
5. The Widget will then find the closest time(s) and date(s) available:

6. You then have the option to filter more parameters including Time, Date Range, Preferred Provider, Wait Times, and more.
7. Depending on the priority of your client, you may prioritize your search by Date, Time, and or Waiting times.
8. Once the Appointment finder locates your best appointment, all you need to do is book it!
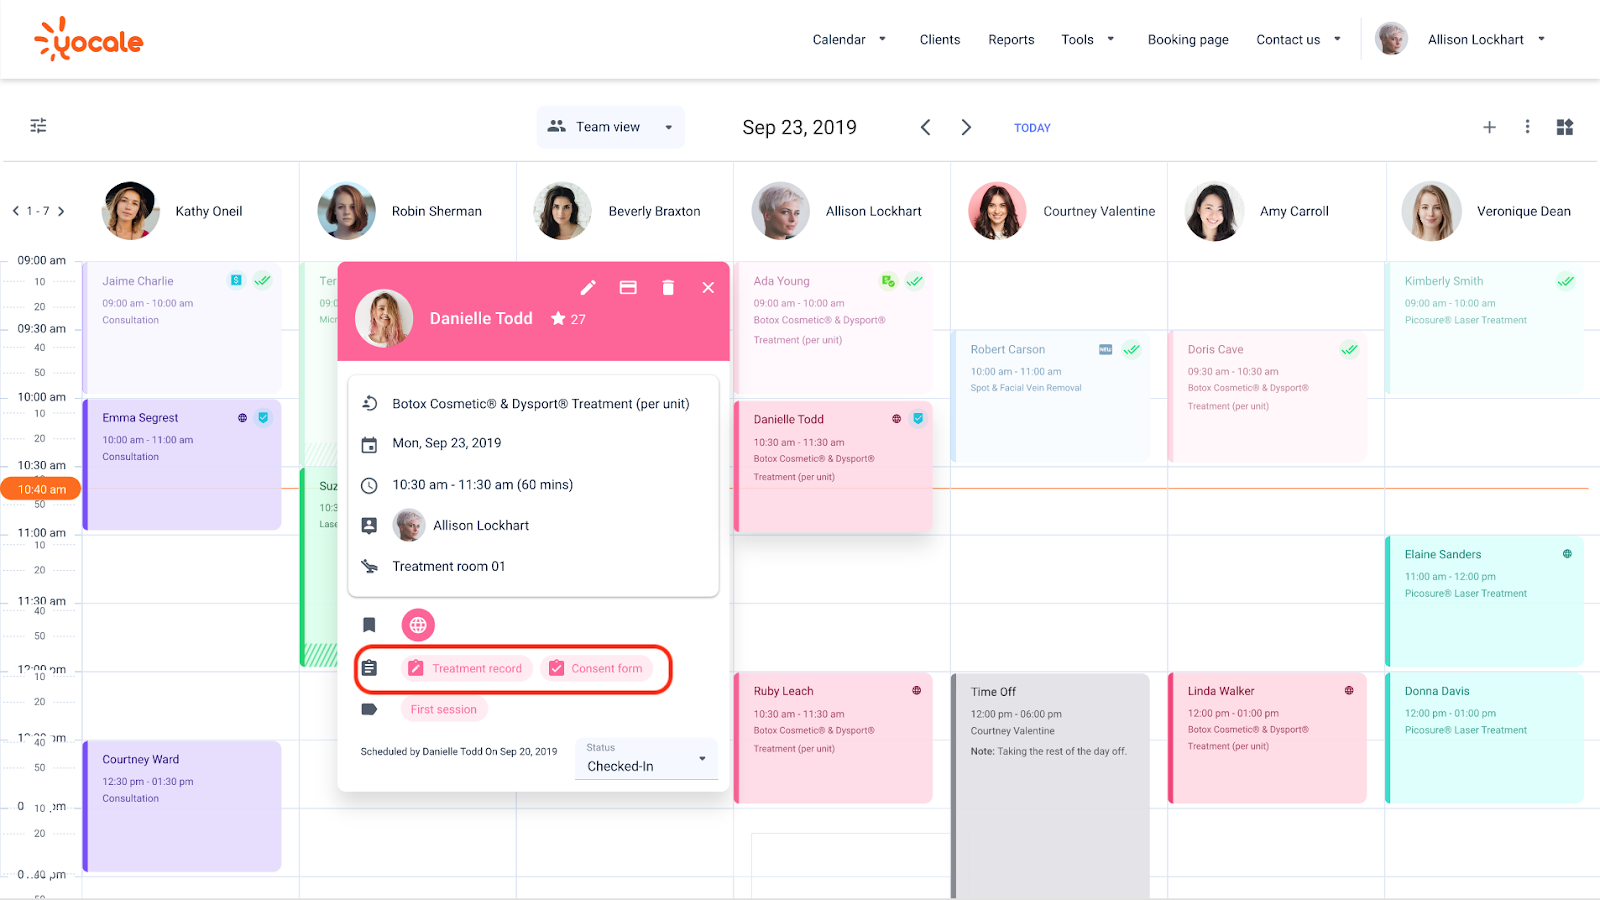
Appointment Preview
The appointment preview is useful for quick access to the following, pronto!
- Preview appointment information and details.
- Quick access to areas like client record, client form, invoice for the client, etc.
- A quick way to change or modify the appointment.
To access the appointment preview, simply single-click on an appointment on the calendar

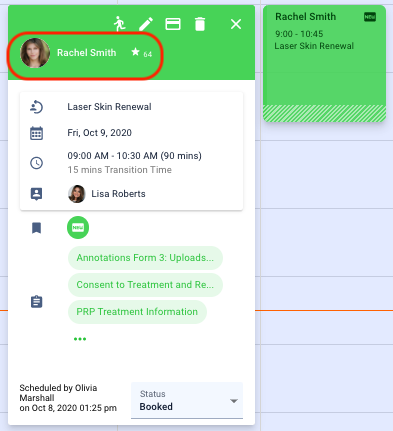
Together, we can preview the appointment you’ve just created. You should see something like this:
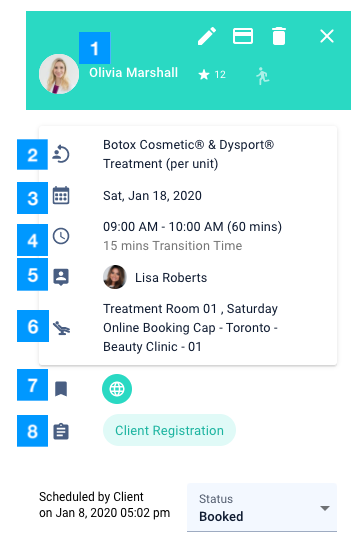
- Client name – A shortcut to the client’s profile and all related information like alerts
- Service Name
- Appointment Date
- Appointment Time – Shows duration of appointment and transition time)
- Service Provider
- Resources used – Displays resources assigned to this service
- Icons -Online booking, completed appointment, a new client to business, a new client to provider, multi-service bookings, recurring booking, paid.
- Forms – A shortcut to informative forms associated with this service
To manage certain appointment aspects in the appointment preview, make use of these icons:
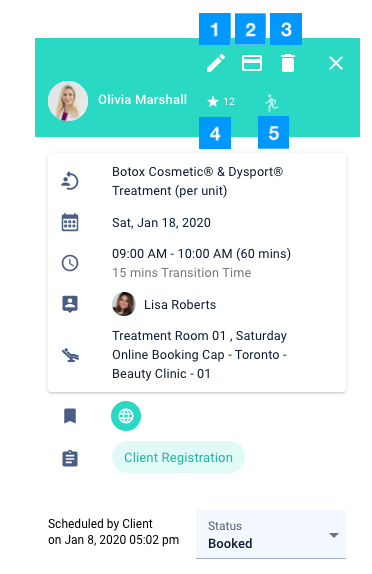
- Edit appointment – The pencil icon takes you to the expanded appointment window where you can make changes to the service, date & time, provider, etc.
- Point of Sale – The card icon takes you to Point of Sale for checkout
- Delete appointment – The trash icon to delete this appointment
- Client rating – the star rating icon is a cumulative running score of this client’s appointment history. The higher the score, the more likely they are to show up for their appointment based on their past record.
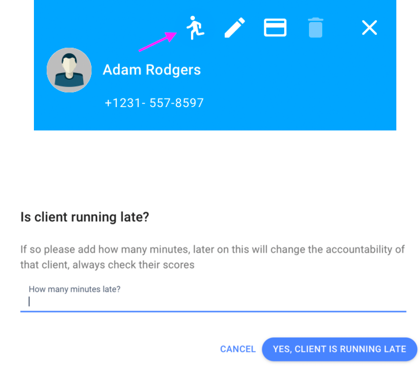
- Running late – If your client is running late, you can use the running icon to record and track a client’s accountability. This will as well automatically contribute to their trust score:
Now, to view the booking details or the status of this appointment follows along:
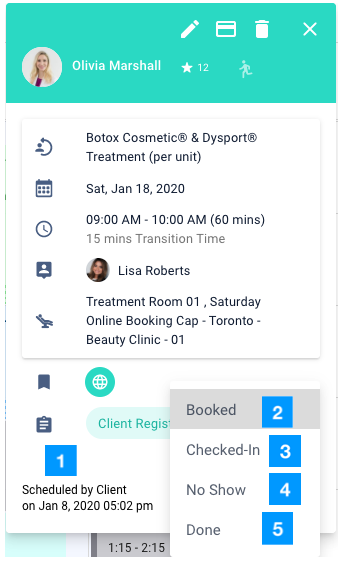
- Who – See who booked this appointment and when?
- Booked – The initial status of an appointment is given
- Checked-in – Select this option when a client has arrived at the business and checked in for their appointment
- No-Show – Select this status in the unfortunate circumstance when the client has not shown up for their appointment, which will also close the appointment
- Done – When an appointment is finished, use the Done status to mark the appointment as completed and progress to the invoice & POS.
To access and view client forms via your Calendar, click on an appointment we created and associated with the form. In the appointment preview, you will see the correlated forms:
Selecting a Form in the appointment preview will open the preview of the form in the calendar window.
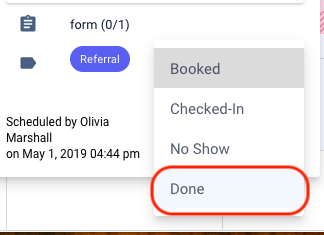
How to mark an appointment as complete
You just finished servicing your client, now it is time to mark their appointment as complete:
- Select the appointment on the calendar you want to close (the appointment preview screen will pop up) > Select the Booking Status button:

- From the drop-down list, select Done
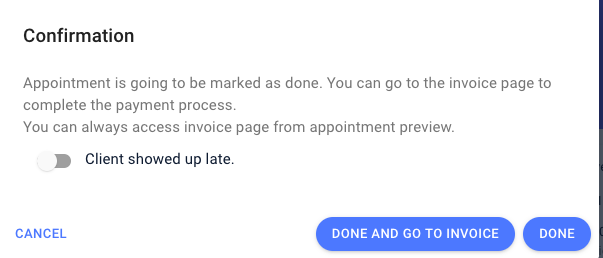
- This will bring up an option to finish the appointment as Done which will mark the appointment complete and return to the calendar or Done and go to Invoice where you can complete the invoice and payment for this appointment.
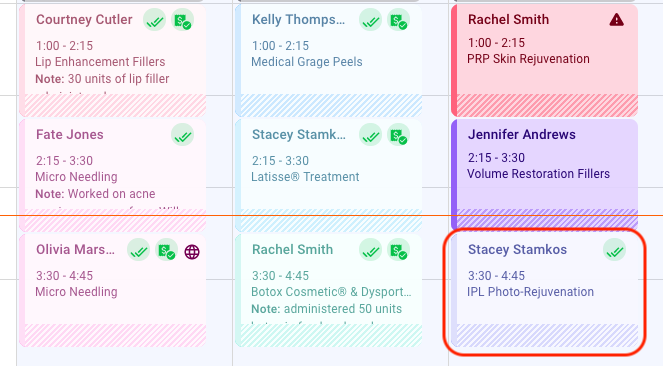
As soon as an appointment is marked done on your calendar, it will turn into a lighter color on your calendar and include a green double check mark icon on the appointment:
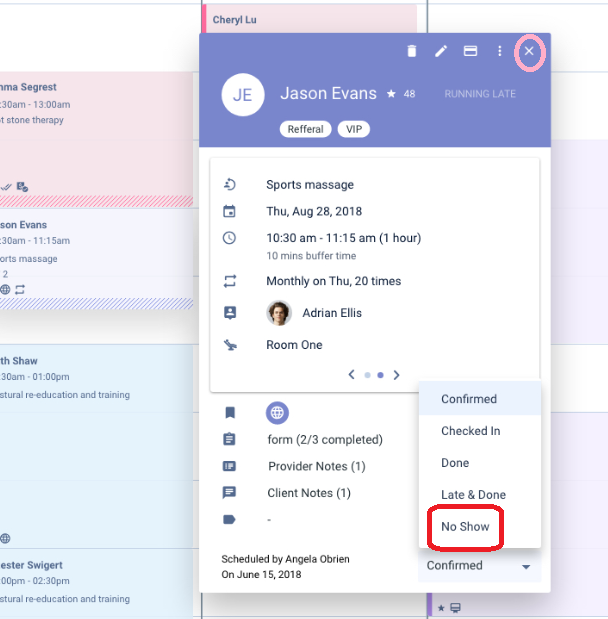
How to manage no-shows
No-shows are a big issue, so keeping track of consumers who are no-shows can limit your loss. You can track and manage client no-shows in 2 different ways. Directly from your calendar and the other way is from the client’s profile which will be discussed in the Client Management chapter.
On your calendar, record the no-shows as they transpire:
- From your Business Calendar, click on the Appointment.
- Select No Show from the drop-down menu as outlined in red.
- Click on the X to close and save as outlined in Pink.
Fast Access to Profiles and Submissions
Finally, you can access your client’s profile and full details directly from your calendar. On your calendar, select the appointment of the client whose profile you want to access > select their name/image and jump into their profile directly:
You can as well access all this client’s documents and submissions (discussed in detail within the Forms Chapter). On the same appointment preview window, you will see the forms that have been assigned to this client:
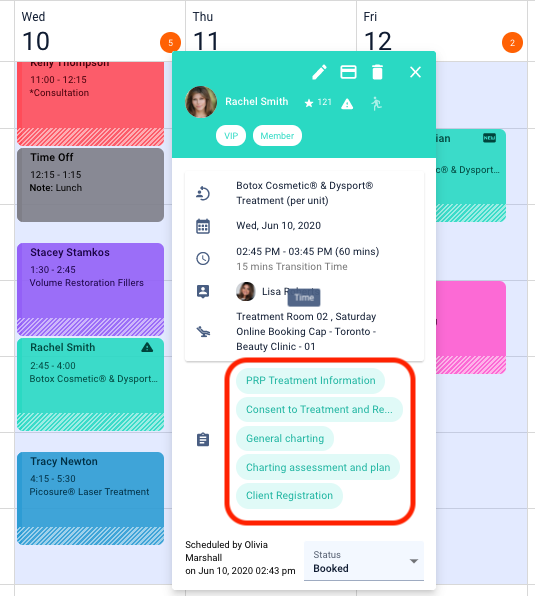
To view or edit documents, go ahead, and click on the form of choice. Another option to access this information is from the same appointment preview, by selecting the edit (pencil) icon:

From the Forms tab > select the edit icon on the Form you want to edit or annotate on:
🎥 Video Guide: Booking, editing, and canceling appointments.